 |
| Here is the pattern, you can try to right click and then fiddle about at your end with printing it out onto two A4 sheets, OR just wait until hubby dear puts it into a zip for me... |
This may not work at all... though I did try very hard if it doesn't....
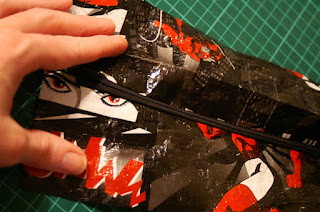
The above is the original sandwich bag that I took my pattern from. Behind it you can see the shopping bag, that I have cut up and utilized as our youngest boy's sandwich bag. It is a plastic weave fabric (if fabric is the right word!), which is fairly robust, so a large needle, denim would be sufficient, on your machine is most definitely called for, as is a thick cotton thread.
Here you can see the cut out parts of the bag. Whilst it doesn't look that clear from here, once you have your bits you'll understand what this jumble is.
Begin by unpicking the seams on your shopping bag and then cut them out in accordance with the pattern.
PLEASE check that your cutting board is free from 'debris' - this will avoid any slicing accidents which happened in my haste to get the bag finished for the next day (I will start on another cushion for my mother just as soon as I've mopped up the tears!)
 |
| The main body, two sides added together makes one large rectangle. |
Sew together the main body parts, using a 1/4" seam. Fold and then sew this seam flat, this will ensure water tight integrity.
 |
| small side rectangle attached to the main body |
Fold the side panels in half length ways to find the middle line. Attach the panels wrong sides together with the main panel, ensuring the middle line marries the central seam along the bottom of the main panel.
 |
| Other side panel ready to be sewn. |
 |
| Top rectangle and zip. |
 |
| Using the zip foot, sew along the edge of the zip. Right side to right side. |
 |
| Another angle for the same bit above. |
Sew the top rectangles to the zip (or zip's if you don't have one long enough 13", then use two meeting in the middle.) Fold the seam flat, then sew into place if you wish.
 |
| Second zip side |
 |
| Both sides sewn into place, |
 |
| Folded into position and out flat to neaten edges. Sew the sides (the ones attached to the bottom of the main panels) to the main panel, I chose not to pin much on this make as accuracy wasn't a great necessity for me at this time.. if I were to be making for another though I would chose pins. Fold the zip panel in half to find the middle point, do the same with the bag. Match together the mid points on both the main panel and the zip panel, holding wrong sides together. Sew along a 1.4" seam across the top. Do the same with the opposing side.... Now the tricky bit.... Sew the zip panel down the side edges - On all four edges Remember to keep an overlap where the zip panels meet the side panels. Sew along these last few bits - wrong sides together and a patient hand. I would have taken photo's at this stage but, my other half not realising that the bag wasn't finished sent it off with our son to the child minder!.... No binding, or handles... nothing! The final bag.... We have now created the zip file for your pattern to print out... all I need now is somewhere to store it, so I can link this to that... all in good time, lets not run before we can walk x J x Bag design tutorial Pattern Click on the above link to get the tutorial in zip format, you will then be able to print it out onto A4 sheets and tape them together. Good luck x . |


No comments:
Post a Comment